Anti-Cheat error "Secure Boot is disabled"
In the configurations of Windows 11 users, when playing on FASTCUP.NET with the GameGuard Anti-Cheat, the ‘Secure Boot’ option is required to be turned on. Such a requirement allows to improve anti-cheat protection from modifying the system bootloader and normally does not require any extra actions from users, since Secure Boot is a mandatory system requirement when installing Windows 11.
If the error ‘Secure Boot is disabled’ occurs, please follow the instructions below:
You can check if the Secure Boot option is enabled as follows: press the Windows logo key on your keyboard, type msinfo32 in the search box, and hit Enter.

This will open the ‘System Information’ window. Find the ‘Secure boot state’, it should be set to ‘On’.
If it’s turned off, we recommend that you save the motherboard model information stated in the ‘BaseBoard product’ field. This can be useful, as the most detailed instructions for enabling Secure Boot are in the manufacturer's manual.

Below are examples of activating this feature for major motherboard manufacturers. The following conditions must be met to enable the Secure Boot feature:
- Enter UEFI — a modern graphic analog of BIOS. To enter UEFI, you need to restart the computer, then at the first signs of its starting, repeatedly press the F2 or Delete buttons BEFORE Windows starts up.
(If it didn’t work, turn off your system and try again. Your motherboard manufacturer may have set a different key combination.)

2. Make sure you switched the boot mode from one enabled as Legacy/CSM mode to UEFI mode. Usually, this option can be found in the Boot or BIOS tabs. Note that the operating system type must be set to ‘Windows 8/10 Features’, not ‘Other OS’.


3. The Secure Boot option is enabled. Usually, this setting can be found under the Boot, Security, and BIOS sections. The following are some examples of enabling Secure Boot:

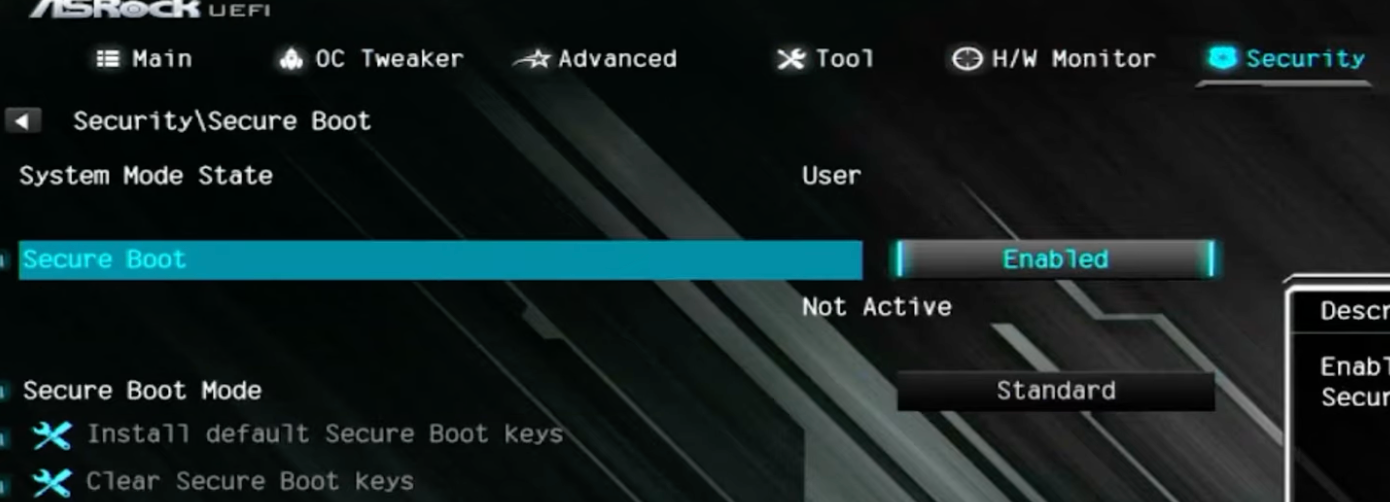


4. If the Secure Boot state is ‘Disabled’ or ‘Not active', you may need to change Secure Boot Mode from ‘Custom’ to ‘Standard’ or restore the keys to default settings. For example, to reset the keys, you can use the ‘Install default Secure Boot’ or ‘Restore factory’ keys or the ‘Load Default PK’ option.

5. It is worth mentioning that if the operating system doesn’t boot after enabling Secure Boot and you see the UEFI screen instead, then you should undo the changes you have made. Most likely, the problem occurs as in order to run the operating system with the CSM function disabled, you need to convert the disk from MBR to GPT. This can be done through third-party software. Once completed, go back to step 1.
Please note that the information given in this article is general as each manufacturer has their own UEFI graphical user interfaces (GUI) and the most accurate indications can only be found in the motherboard manual.
See how to fix the error 00000057 and disable Core Isolation (hvci):
https://help.gameguard.ac/en-error-00000057-disable-core-isolation-hvci